This Is The Last Suede Care Video You'll Ever Watch
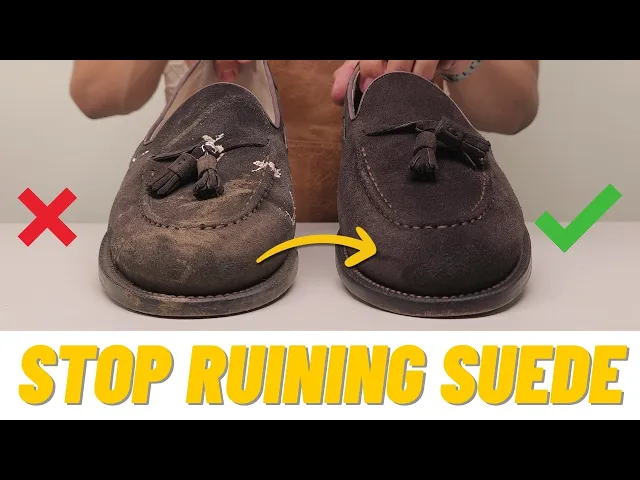
I recklessly wore a pair of $395 Grant Stone suede loafers because I wanted to show you exactly how to bring this material back from the dead. Most people see suede that looks dirty, flat, or matted and immediately assume it is time for the trash bin.
That is exactly what the industry wants you to think. They want you to believe that suede is a fragile, single season material so you will keep buying more. I am here to tell you that the enemy is not the weather or the dirt: it is misinformation.
Leather is incredibly durable and built to last if you have the right framework. People discard high quality goods worth saving simply because they lack a reliable system for restoration. My goal is to close that gap and show you that even the most "ruined" suede can be revived.
Establishing Shape and Structure First
Before any cleaning begins, you must give your suede item some structural integrity. I always use a cedar shoe tree to help the footwear hold its shape while I work. Suede is comprised of millions of tiny fibers, and if the shoe collapses in your hand, you cannot clean those fibers evenly.
Without structure, you are just pushing dirt around in the creases. Once the item is taut, I start with a Grant Stone horsehair brush to remove loose surface debris. Surface prep is the stage where most people fail by introducing moisture too early.
If you apply a liquid cleaner to a dusty surface, the dirt turns into mud. This mud then cakes into the suede fibers, making your job ten times harder than it needs to be. A horsehair brush is perfect for light debris, but deep cleaning often requires more bite.
The Essential Dry Cleaning Phase
Sometimes a soft brush is not enough to dislodge the grit sitting deep inside the nap. In those cases, I reach for a pig bristle brush to provide the necessary friction. This type of brush has stiffer bristles that can actually penetrate the texture of the suede.
If you do not have a specialized brush, you can use a common toothbrush with a simple hack. Take a pair of sharp scissors and cut the bristles down by half. This creates a much more sturdy tool that allows you to scrub out stubborn debris with precision.
I also find that using a thin, hard tool to gently scrape off surface buildup works wonders. While it may feel nerve-wracking to "scrape" your leather, suede is actually quite resilient. Do not be afraid to be firm.
Lifting Dirt with Friction and Erasers
If the brushes leave marks behind, a proper suede eraser is your next line of defense. These are not your standard office erasers: they are formulated with a gritty texture specifically designed to pull dirt onto the shavings. The science here is based on friction and transfer.
As you rub the eraser against the suede, the dirt clings to the bits of rubber that fall away. You must brush these shavings off with every few passes. If you leave the shavings on the surface, you risk rubbing the lifted dirt right back into the fibers.
The sequence is simple: rub, brush, and repeat. I have found that the majority of suede problems can be solved entirely with these dry steps. However, if you are dealing with deep staining or heavy oils, it is time to move into the wet cleaning phase.
The Correct Protocol for Wet Cleaning
This is the part where most people get nervous, but I am here to hold your hand through the process. The biggest lie in the industry is that you cannot get suede wet. The truth is that it is not the water that ruins suede, but rather how much water you use and how the leather dries.
I use a concentrated cleaner diluted to specific ratios based on the level of soiling. For light dirt, a 1:4 ratio of cleaner to water is sufficient. For heavy stains, I may go as concentrated as 1:1, but you must never use these products at full strength.
Leaving excess cleaner in the fibers can dry out the material or lead to faded colors. You want to apply the solution with control, keeping the suede evenly damp rather than soaking it through. Always clean the entire panel of the shoe rather than spot cleaning to avoid leaving watermark rings.
Restoring the Nap After the Wash
Cleaning is only half the job. After the suede is clean, you must pat it dry with a clean cloth to remove as much moisture as possible. Never use a hair dryer or direct heat, as this will cause the leather to stiffen and crack.
Let the item dry naturally in a room with good airflow. When it is dry, it will likely look worse before it looks better. The fibers often dry flat, stiff, and matted, but this does not mean the suede is ruined.
This is where a crepe brush becomes essential. A standard brush does not have the grip required to lift flattened fibers, but the crepe rubber grabs the nap and pulls that soft, velvety texture back to the surface. Minimal shedding is normal during this process.
Dealing with Loose Fibers and Singeing
During a deep clean, you might notice long, hairy fibers standing above the rest of the nap. These excess fibers can make the suede look unkempt. To restore a pristine look, I often use a lighter to very quickly singe these hairs away.
You must move the flame rapidly and never hold it in one spot, or you will burn the leather. If you are uncomfortable with an open flame, there is a hack that even many professional cobblers do not use. An electric shaver on its lowest setting can gently trim those loose fibers for a uniform finish.
If the color still looks lackluster after the nap is restored, you can use a suede renovator. Sometimes the pigment is just hiding under dryness, and adding a bit of moisture brings the original depth of color right back. This step transforms the leather from dull to vibrant in seconds.
The Final Layer of Protection
Once the suede is clean and the nap is upright, you need to protect your hard work. I use a high quality protectant spray to create a hydrophobic chemical bond on the surface. While I prefer products without harsh chemicals, the industry standard for performance usually requires a strong formula.
Always spray outdoors or in a well ventilated area while wearing a mask. Apply the spray evenly from about six to eight inches away. You want a consistent protective layer across the entire piece rather than soaking one specific spot.
This is not a "magic armor" that makes the shoe invincible, but it buys you time. If you spill a drink or get caught in the rain, the liquid will bead up on the surface instead of soaking in. Routine care prevents premature wear: it is as simple as that.
Moving Forward with Better Habits
We have been taught that wear means failure and that damage means replacement. This is a consumerist trap designed to keep you spending money on low quality replacements. When you buy from reputable brands like Grant Stone and understand the material, your goods can last for decades.
Suede is one of the most resilient leathers in my collection. It just requires a bit of stewardship and the right set of tools. You do not need to be a professional to get professional results at home.
Take a look at your closet and find that one pair of shoes you thought was a lost cause. Apply these steps, take your time, and watch the transformation happen. If you take care of what you own, it will take care of you tenfold.
If this helped your leather, consider supporting Evumies. It is always free, and always will be. A small tip keeps the mission going: Support Evumies.
Watch the Full Video
See every step of this process in the video this post is based on.
Evumies Recommends
Products We’ve Tested & Trust
EVUMIES RECOMMENDED
Leather Honey Leather Conditioner
Keeps leather supple and crack-free — one coat lasts up to 6 months.
4.9
See on Amazon
EVUMIES RECOMMENDED
Bickmore Bick 4 Leather Care
Restores moisture to dried leather without darkening or leaving any residue.
4.7
See on Amazon
As an Amazon Associate, Evumies earns from qualifying purchases.